As the winter season approaches, homeowners often face the dilemma of rising energy costs and the uncomfortable chill creeping in through windows. Drafty windows can account for a significant portion of heat loss in a home, making it harder to keep indoor spaces warm without cranking up the thermostat. Fortunately, weatherproofing your windows is a straightforward and cost-effective solution that not only helps keep your home warmer but also reduces your energy bills. In this comprehensive guide, we’ll explore step-by-step how to weatherproof your windows for the cold months ahead.

1. Inspect Your Windows for Leaks
Before you begin the process of weatherproofing, the first step is to assess the condition of your windows and check for any gaps, cracks, or areas where cold air may be entering your home. Identifying leaks early on ensures that you don’t waste energy heating your home while allowing heat to escape. Here’s how to check:
- Visual Inspection: Start by visually examining your windows. Look for any cracks, broken seals, or areas where the window frame may have deteriorated over time. Pay close attention to the corners, where windows are most likely to experience wear.
- Check for Drafts: On a breezy day, feel around the edges of your windows for cold air using the back of your hand or the side of your face. If you can feel a draft, this indicates that the window seal may have broken, or the window has gaps.
- Candle or Incense Test: Another effective method to detect leaks is by lighting a candle or an incense stick and holding it near the window edges. If the flame flickers or the smoke wavers, it’s a clear sign that air is leaking through the window. This method is particularly useful for detecting small leaks that may not be immediately visible.
- Check the Window Frames: Pay attention to the condition of the weather stripping or caulking around the window frames. Over time, these seals can crack, shrink, or wear out, leaving your windows vulnerable to air leaks.

2. Caulk Gaps and Cracks
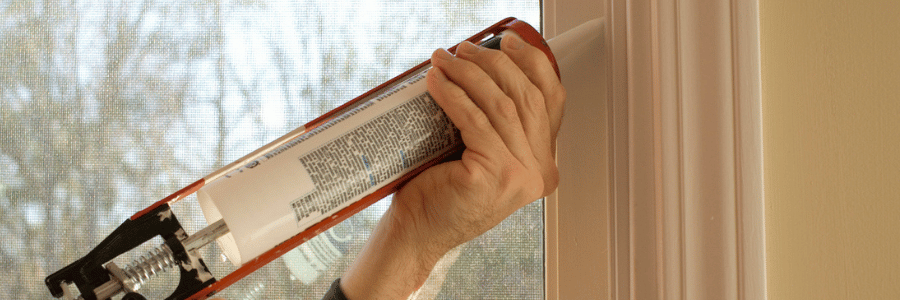
Once you’ve identified areas where drafts are entering, the next step is to seal up those gaps using caulk. Caulking is a simple, affordable solution to fill in small cracks around window frames and prevent air from leaking in. This can significantly reduce heat loss and improve your home’s energy efficiency.
- Choosing the Right Caulk: It’s essential to select a high-quality caulk designed specifically for windows. Silicone-based caulk is ideal for outdoor use as it’s waterproof, flexible, and durable. For indoor applications, especially in areas like trim and interior window frames, acrylic latex caulk works well, as it can be painted over and cleans up with water.
- Application Process: Begin by cleaning the area around the gap to ensure that dust, dirt, or debris don’t interfere with the caulk’s adhesion. Cut the tip of the caulk tube at a 45-degree angle to allow for a controlled application. Then, apply the caulk in a steady, continuous line along the edges where gaps are visible. Use a damp cloth or your finger to smooth out the caulk and ensure that it fills the gap entirely. Finally, allow the caulk to dry and cure for at least 24 hours before using the window.
3. Replace or Add Weatherstripping
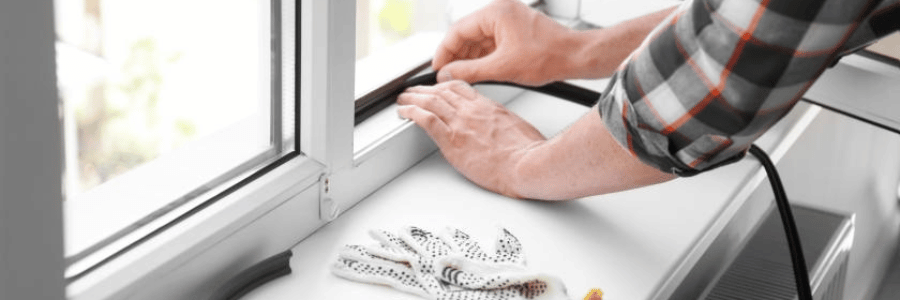
Another highly effective method of weatherproofing your windows is to replace or add weatherstripping. Weatherstripping creates a seal around your windows, reducing air infiltration while improving insulation. It’s especially useful for older windows that may have become misaligned over time, causing gaps between the window sash and frame.
- Types of Weatherstripping:
- Foam Tape: Foam weatherstripping is an affordable and easy-to-install option. It comes in rolls with adhesive backing, which you simply press around the perimeter of the window frame. Foam weatherstripping is flexible and can conform to irregular gaps, making it suitable for most window types.
- Rubber or Silicone Gaskets: For windows that get frequent use or are exposed to the elements, rubber or silicone gaskets are a better long-term solution. These materials are durable and provide a tight, long-lasting seal, but they can be a bit more challenging to install compared to foam tape.
- Felt Weatherstripping: Felt is another common material used for weatherstripping, though it’s not as effective as foam or rubber in blocking drafts. However, it’s a good option for areas where aesthetics matter, as felt strips are often less noticeable.
- Installation Tips: To apply weatherstripping, first measure the perimeter of your window, including both the frame and the movable sashes. Then, cut the weatherstripping material to fit the measured dimensions. Press it into place along the frame, ensuring a snug fit. If you’re using foam tape or adhesive-backed weatherstripping, make sure to press it firmly so it sticks. For more durable options, use a staple gun or small nails to secure the strips.
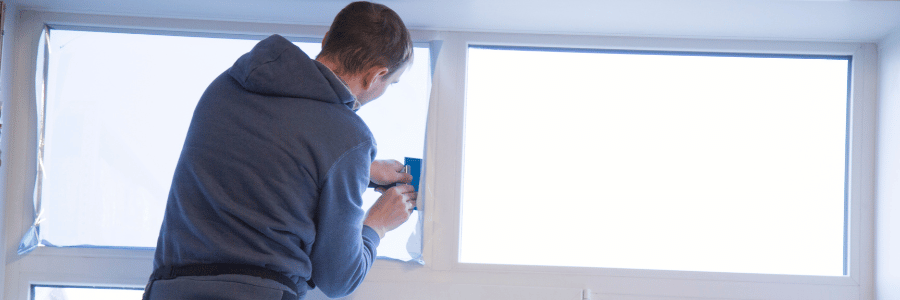
4. Install Window Insulation Film
For homes with older windows that are particularly prone to heat loss, installing window insulation film is an inexpensive yet highly effective solution. Window insulation film works by adding a thin plastic layer over your windows, which creates an additional barrier against heat transfer and air leaks.
- How Window Insulation Film Works: The plastic film helps trap air between the window and the film itself, improving the window’s overall insulating properties. It also helps to reduce condensation and moisture buildup on windows, which can lead to mold and mildew growth.
- Step-by-Step Application:
- Purchase a window insulation kit from a hardware store. These kits generally include plastic film, double-sided tape, and instructions for installation.
- Clean the window frame thoroughly to ensure proper adhesion of the tape.
- Apply the double-sided tape around the perimeter of the window, ensuring it’s level and securely attached.
- Stretch the plastic film over the tape and smooth it down to remove any wrinkles. You can use a hair dryer to shrink the film tightly, which will make it more transparent and create a better seal.
- Benefits: The film provides an extra layer of protection, and it’s particularly useful for windows that are single-paned or poorly insulated. It’s also a temporary solution, so you can remove it when the warmer months arrive.
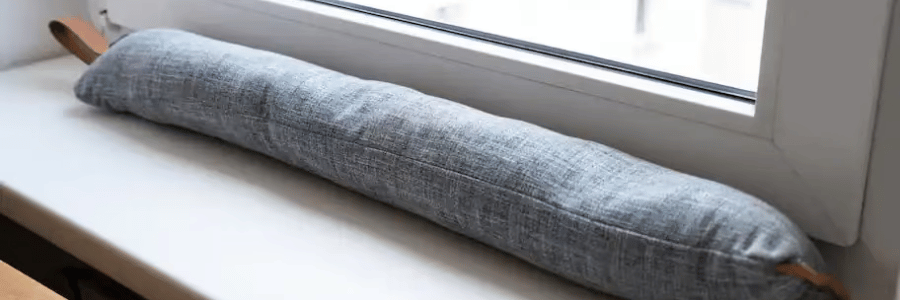
5. Use Draft Stoppers or Window Quilts
For windows with significant drafts or windows that you don’t use frequently, draft stoppers and window quilts can offer additional insulation. These solutions are particularly useful for large windows, sliding glass doors, or casement windows that are hard to seal effectively.
- Draft Stoppers: A draft stopper is a simple and affordable solution to block cold air. These are fabric tubes filled with insulating material (such as foam or cotton) that are placed along the bottom of the window frame or the sill. Draft stoppers prevent drafts from flowing into the room, making it more comfortable.
- Window Quilts or Insulated Curtains: Window quilts are heavy, padded curtains that provide additional insulation against the cold. These are ideal for bedrooms or areas where you want to block out the cold at night. Insulated curtains, which often feature a reflective thermal backing, are another great option for providing a barrier against the cold.
- Benefits: Using draft stoppers and insulated curtains not only keeps your space warmer but also helps reduce noise from outside. They can also add a cozy aesthetic to the room.
6. Upgrade to Energy-Efficient Windows
If you live in a particularly cold climate or your current windows are old and inefficient, upgrading to energy-efficient windows may be the best long-term solution. Energy-efficient windows are designed to minimize heat loss and reduce your home’s reliance on heating systems.
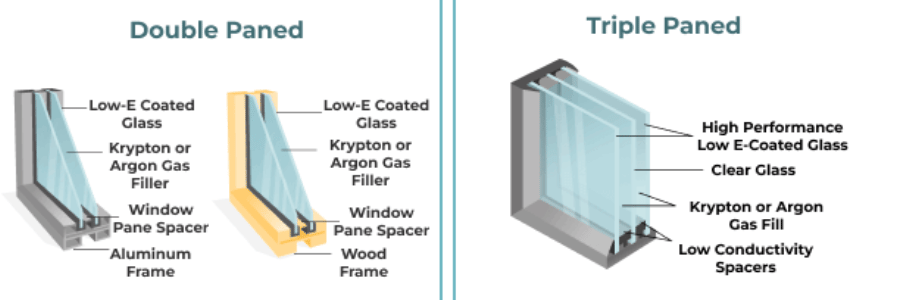
- What Makes a Window Energy-Efficient: Modern energy-efficient windows come with advanced technologies such as double or triple glazing, low-emissivity (Low-E) coatings, and gas fills (like argon or krypton) between the glass panes. These features help to block heat transfer and maintain a comfortable indoor temperature.
- The Investment: While replacing windows can be costly, it’s an investment that pays off in the long run. With energy-efficient windows, you’ll see reduced heating bills, improved comfort, and potentially an increase in home value. Many homeowners recoup the cost of installing energy-efficient windows through long-term savings on energy bills.
7. Check Window Locks and Hardware
In addition to checking for air leaks, it’s important to make sure your windows are closing properly. A window that doesn’t close tightly or is hard to lock can create gaps, allowing cold air to enter and warm air to escape.
- Tighten Loose Screws: Over time, window hardware like locks, latches, and hinges can loosen, causing the window to misalign and leave small gaps. Tighten any screws or replace damaged hardware to ensure that your windows close securely.
- Proper Locking Mechanism: Ensure that the locking mechanism is functioning well and that the window closes evenly. If necessary, adjust the window so that it fits snugly in its frame when closed.

8. Consider Adding a Storm Window
For homes in colder climates, adding storm windows is a highly effective way to enhance window insulation. Storm windows are additional windows that are installed over your existing windows, creating an extra layer of protection against the elements.
- How Storm Windows Help: Storm windows can reduce heat loss by up to 50% by creating an insulating air pocket between the storm window and the original window. They also protect against moisture, wind, and debris, further improving the window’s performance.
- Choosing Storm Windows: Storm windows come in various materials, including acrylic, glass, or polycarbonate. They can be installed permanently or be removable for seasonal use. Some modern storm windows also feature Low-E coatings to further improve energy efficiency.

9. Maintain Your Windows Throughout the Winter
Weatherproofing your windows is not a one-time task. As the winter progresses, it’s important to keep an eye on your windows to ensure they remain sealed and efficient.
- Periodic Checks: During the winter months, periodically check for any new drafts, moisture buildup, or signs of wear in your window seals and weatherstripping. If you notice any issues, address them promptly to avoid further heat loss.
- Cleaning: Clean your windows regularly, both inside and out, to ensure that dust or debris doesn’t accumulate and interfere with the weatherproofing materials. This also helps maintain the aesthetic appeal of your windows.

Conclusion
Weatherproofing your windows is an essential step to prepare your home for winter, keeping it warm, comfortable, and energy-efficient. Whether you choose to caulk gaps, add weatherstripping, install insulation film, or upgrade your windows entirely, each of these steps will contribute to a more comfortable living space and lower energy bills. With a little time and effort, you can effectively weatherproof your windows and enjoy a cozy, draft-free home all winter long.